2. Using Test-Driven Development
Test-driven
development is a methodology that states developers should first think
about how to test their software before they build it. The software
tests are written during the design phase and traditionally take the
form of a unit test and unit test plans. Unit tests
are the "sanity check" tests that developers will create for their
software to ensure that all the primary features and test points
specified in the unit test plan for the feature are covered. For
example, a piece of code that adds two numbers A and B and produces the
result will most likely have a unit test plan that states that when you
pass in 1 and 2 as parameters, you should get 3 as a result. If not,
something is wrong with the code. This is probably the simplest form of a
unit test. Extending this example further, unit test plans also should
cover error conditions. For example, if your code were to display the
result of the division of two numbers, an error check should be made to
ensure that the divisor is not zero. In this case, there would be a unit
test that attempts to divide by a zero value and check to make sure
that this is handled.
2.1. Enabling Unit Test Support
The previous versions of
BizTalk did not offer a straightforward way to unit test BizTalk
artifacts. To facilitate the creation of unit tests, BizTalk 2009
introduces a number of new developer productivity features in the form
of unit testing support for Schemas, Maps and Pipelines.
To configure your BizTalk
project to take advantage of the new unit testing support, open the
properties page and click on the Deployment tab. There is a new section
at the bottom called Unit Testing. Select 'True' for the Enable Unit
Testing property. This will modify the BizTalk artifacts so that they
inherit from TestableSchemaBase, TestableMapBase or
TestablePipelineBase.
2.2. Validating a Schema
Create a new unit test by
selecting New Test from the Test menu in Visual Studio. Add the
Microsoft.BizTalk.TestTools assembly to the project references. If you
are testing pipelines then you will also need to add
Microsoft.BizTalk.Pipeline and Microsoft.BizTalk.PipelineOM. These will
provide access to these new features for your test project.
The validate schema method signature looks like:
Public bool ValidateInstance (string inputInstanceFileName,
OutputInstanceType inputType)
And testing a schema is as simple as:
[TestMethod]
public void TestSchema()
{
String fileIn = @"c:\dev\testinput.xml";
//The schema we are testing is called POSchema
POSchema schema = new POSchema();
Assert.IsTrue(schema.ValidateInstance(fileIn, OutputInstanceType.XML));
}
A test like this will tell
you whether the input failed or succeeded. However, if the test fails
there is no way to get the details as to why the input failed. In order
to obtain the information to help you diagnose the issue you will have
to open the schema in Visual Studio, change the setting to use the
failed input message and look at the results in the output window.
2.3. Testing a Map
The test map method signature looks like:
Public void TestMap (string inputInstanceFilename, InputInstanceType inputType,
string outputInstanceFilename, OutputInstanceType outputType)
And testing a map can be as simple as:
[TestMethod]
public void TestMap()
{
TestableMapBase map = new ExampleProject.SampleMap();
Map.TestMap(@"c:\dev\testinput.xml", Schema.InputInstanceType.Xml,
"MapOutputFile.xml", Schema.OutputInstanceType.XML);

//at this point we have a result from the map. Lets validate it against the schema.

Schema.TestableSchemaBase outputSchema = new ExampleProject.OutputSchema()
Bool result = outputSchema.ValidateInstance("MapOutputFile.xml",
Schema.OutputInstanceType.XML);

Assert.IsTrue(result, "The output does not validate")'
}
It is common practice to compare the output of the map to a known good output file.
2.4. Testing a Pipeline
And the test pipeline method signature looks like:
public void TestPipeline (StringCollection documents, StringCollection parts,
Dictionary<string, string> schemas)<string, string>
And testing a pipeline can be as simple as:
[TestMethod]
public void TestReceivePipeline()
{
StringCollection documents = new StringCollection();
Documents.Add(@"c:\dev\testinput.xml");

StringCollection parts = new StringCollection();

Dictionary<string, string> schemas = new Dictionary<string, string>();
Schemas.Add("ExampleProject.InputSchema", @"
..\..\..\ExampleProject.InputSchema.xsd");

Microsoft.BizTalk.TestTools.Pipeline.TestableReceivePipeline pipeline
= new ExampleProject.Pipeline();
Pipeline.TestPipeline(documents, parts, schemas);
}
2.5. Taking Advantage of BizUnit
In addition to the unit
testing enhancements to BizTalk it is also helpful to utilize BizUnit to
help facilitate the creation of unit test plans. BizUnit, which is a
free tool available at http://bizunit.codeplex.com/, is an add-on library that can be used with the Visual Studio Team System Testing Tools (MSTest) functionality or with NUnit,
a community-developed tool that allows developers to create unit test
harnesses for their source code. For more information on NUnit, see the
release package at www.nunit.org. BizUnit provides additional reusable test steps that allow you to test the entire range of code in your BizTalk applications.
2.6. Getting Your Test Process Together
Once you have created the
unit test plans and the associated unit tests using BizUnit with either
MSTest or NUnit, you need to think about how to get your test process up
and running. In traditional software projects, the unit tests will
simply reference the DLL and its methods to be tested. Test data will be
passed as arguments to each of the functions in question and the result
recorded, which will indicate whether the unit test was successful or
not. This is not the case in a BizTalk project.
What you will need to do in a
BizTalk project is to create a series of test messages that will
simulate the various conditions outlined in your unit test plans. For
example, in the previous exercise, you defined the interfaces for the
fictitious integration project. If you were to create unit test plans,
you would need to create XML documents to be used to simulate real-world
messages that would be flowing through the system. These documents
would be structured so that they will cause conditions in your unit test
plans to be executed. A condition might be to check whether items that
are not in stock should be rejected. This is an example of a business
requirement being tested.
An example of an error
condition would be to check that an incoming document conforms to a
proper schema. If the document does not, it should be routed to an
exception mechanism. Using test-driven development helps you to think
about all the potential scenarios that might otherwise go unnoticed.
Test-driven development also helps to avoid the "we didn't code for the
scenario and it wasn't in your requirements document" argument that
often occurs with the end customer of the software. Test-driven
development often helps to find these types of issues before coding even
begins and allows the customer to decide whether or not the issue is
something they want to address.
3. Creating a BizTalk Installation Package
The primary
mechanism within BizTalk to create an installation packet is through the
creation of an MSI package by using the BizTalk Administration Console.
Since BizTalk solutions are organized according to applications, the
console provides the functionality to export an MSI package based on the
configuration and artifacts that are included within the BizTalk
application. Additional files can be included as referenced assemblies,
which is ideal for packaging satellite DLL files or configuration files
that are not included as artifacts but are still required for the
solution to run properly. If your solution exposes web services, the MSI
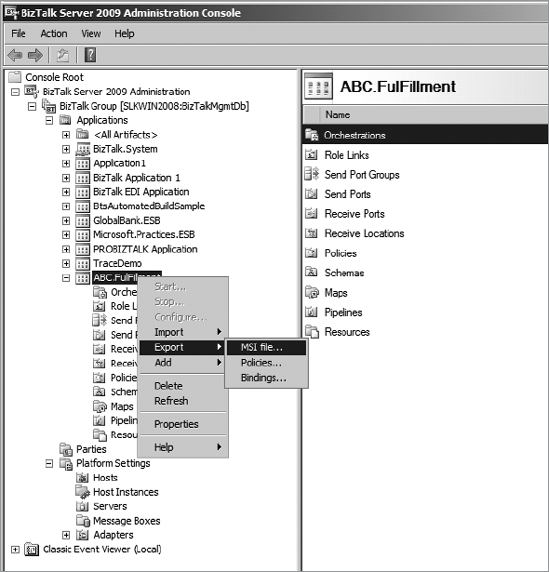
package will also include the web settings. The MSI file is generated
by first right-clicking the BizTalk application in the BizTalk
Administration Console and choosing Export MSI to bring up the Export
Wizard. The wizard will guide you through the process of creating your
export package by having you select the resource(s), dependencies, and
destination location for the MSI. During the process, a progress status
window is provided and a final summary page appears with any failures
encountered during the export process. The MSI package that is created
contains the binaries, resources, configuration, and binding file
information to import the application on another BizTalk installation,
as shown in Figures 2 and 3.
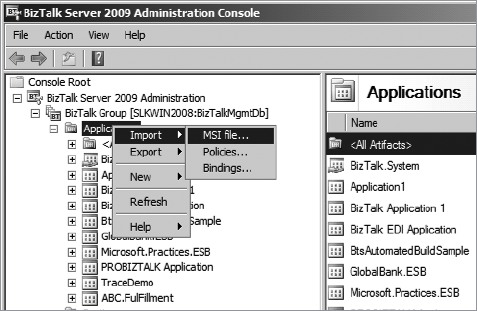
In order to install the
application, you need to first run the MSI package on each machine that
will be hosting it. To do this, simply click the MSI package to import
all the necessary assemblies and resources and install them into the
GAC. This must be done on each BizTalk Server node that will host the
application. You then need to import the BizTalk Server artifacts into
the system by opening the BizTalk Administration Console, right-clicking
the application, and choosing Import as shown in Figure 3.
The import process not
only imports the BizTalk Server artifacts, but when a binding file is
included in the MSI, it also sets the port bindings and port
configurations. This needs to be performed only once per install since
these settings are deployed to the BizTalk Management DB.